Friday, May 13, 2011

Emergency Clutch Tutorial...so cute!

Saw this post a few days or so ago on Eighteen25's blog. Since I'm having a new baby soon I thought I should make a few... one for the car, diaper bag, hubby's car... you can never have enough band-aids, motrin, or chapstick when everywhere you go, YOU GO with children:) The original tutorial can be found HERE. I modified the original just a bit...
First of all... I live NOWHERE near a Target so I went to the next best thing... Dollar General... haha! Also I used sandwich size baggies instead of snack size baggies. I cut some scrapbook paper scraps and filled the bottom half of the bag just for a little extra cuteness...
The scrapbook paper is subtle but makes for cute dividers:)


I definitely like the Target pot holders, but for the Dollar Store... these aren't bad and only $1.

(the above photo belongs to Eighteen25)


Love that blog!!!

linked to...


Wednesday, May 11, 2011

DIY Groovy Flower Polka Dot Pots

I was inspired by other bloggers to decorate some pots. I liked the polka dot look and the twine look so I thought, "why not combine them?" Below is my "how to." First step is obviously to purchase some clay pots and spray paint.
I traced around my paint bottle with a sharpie. I used a plain old kitchen sponge for the polka dots and sponged them on with white craft paint. Then I sealed my pot with a spray sealer.
For the twine accents, I found this stuff at Dollar General next to the car wax? Says it is 3 ply but it seemed pretty flimsy.

So I took 9 strands and braided them to make a thicker piece of twine.

It was a great braiding lesson for my 6 year old too.

For the pot with the twine bow... leave a long tail and then knot, then braid... measure every so often so that you get a braid the exact circumference of your pot. Then tie another knot. Then hot glue the braid to your pot.

Then tie a big knot or bow or whatever you choose... I added some hot glue to my bow just to secure it. If you like the wrapped braided look then braid at least 10 feet of twine... same technique here... just hot glue the twine to the pot in the place of your choice.

So pretty and decorative.

Linked to...


Tuesday, May 10, 2011

Tuesday's Recipe... Strawberry Rhubarb Pie

Strawberry Rhubarb Pie.... Yummy! Yep its strawberry/ rhubarb season:) Recipe is below... and I'm not going to pretend I know how to make a good crust yet:) I keep trying but for now Pillsbury knows what they are doing:)
Something I did finally learn... tuck the top of the crust under the bottom and then pinch... seals wonderfully. For some reason I never knew this???
Beautiful isn't it! Don't forget to slice a few vent holes in the top of the pie.
Line a baking sheet with foil and place it under your pie because if this sucker boils over it will ruin the pie in the air smell.

Strawberry-Rhubarb Pie Recipe

Crust: you are on your own for now
Filling:
1 1/2 cups diced rhubarb
1 cup sliced strawberries
1 1/2 cups sugar
3 tbsp. tapioca
1/2 cup sour cream
~Pour 1/2 cup sugar over the sliced fruit, stir, and let it set for at least an hour. Once the fruit has soaked in the sugar for at least an hour, add the remaining ingredients. Pour into your crust and cover with the second crust. Bake at 350 for 50-60 minutes.

Friday, May 6, 2011

Happy Mother's Day!

Before I was a Mom,
I never tripped over toys
or forgot words to a lullaby.
I didn't worry whether or not
my plants were poisonous.
I never thought about immunizations.
Before I was a Mom,
I had never been puked on.
Pooped on.
Chewed on.
Peed on.
I had complete control of my mind
and my thoughts.
I slept all night.
Before I was a Mom,
I never held down a screaming child
so doctors could do tests.
Or give shots.
I never looked into teary eyes and cried.
I never got gloriously happy over a simple grin.
I never sat up late hours at night
watching a baby sleep.
Before I was a Mom,
I never held a sleeping baby just because
I didn't want to put her down.
I never felt my heart break into a million pieces
when I couldn't stop the hurt.
I never knew that something so small
could affect my life so much.
I never knew that I could love someone so much. I never knew I would love being a Mom.
Before I was a Mom,
I didn't know the feeling of
having my heart outside my body..
I didn't know how special it could feel
to feed a hungry baby.
I didn't know that bond
between a mother and her child.
I didn't know that something so small
could make me feel so important and happy.
Before I was a Mom,
I had never gotten up in the middle of the night
every 10 minutes to make sure all was okay.
I had never known the warmth,
the joy,
the love,
the heartache,
the wonderment
or the satisfaction of being a Mom.
I didn't know I was capable of feeling so much,
before I was a Mom...


My Mom and me!

Thursday, May 5, 2011

Basement Family Room Makeover and Brag Wall Tutorial

I am thrilled that our house makeover/remodel is coming to a close. I wanted to share half of the finished family room in the basement... only half because the south wall is a built-in entertainment center and it isn't ready yet:) Below is the "before." Technically this was a "finished" basement however the first time we updated we did the bare necessities (painted the cement and got new carpet.) So we "started over" and made it much more functional. We drywalled the walls and ceilings... oh and added the boy bedroom for one more bedroom.
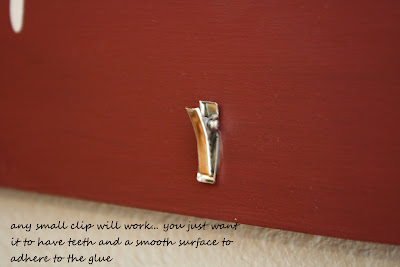
I want our home to be beautiful and current but still reflect us so I created this brag wall. It has a name plaque for each child and their latest "art." All it takes is a little vinyl lettering of your choice, any kind of scrap wood or pressed wood painted to match your decor and wire to hang them.... oh and a little tacky glue:) I purchased the below pictured clips in bulk on ebay... I use them for hair accessories and a few other things too... cost $5 for 100... great deal!

Be sure and let the glue dry over night!!!

The kids love their brag wall and it frees up a little bit of refrigerator space:)

Linking up to...

Photobucket
UndertheTableandDreaming

Tuesday, May 3, 2011

Tuesday's Recipe...Cheesy Potatoes

These potatoes are glorious and super easy to whip up. They go great with my Swedish Meatballs or any other meat you may desire.
To begin microwave your hashbrowns, Lawry's and butter for 4-5 minutes.

Then microwave your Velveeta until it is completely melted. (be careful this will boil over)
Add the Velveeta, cream, cheddar cheese, and sour cream. Combine completely.
Place into a greased baking dish... 9x9 or casserole dish works best.
Bake for 45 minutes at 375 degrees. Glorious Cheesy Potato Recipe
- 1 bag of hashbrowns (30 oz.)
- 4tbsp. butter
- 1 tsp. Lawry's Seasoning Salt
-1/2 cup Table Cream or Heavy Whipping Cream
-1/2 cup Sour Cream or Light Sour Cream
-1 can of Cambell's Cheddar Cheese
-8 oz. Velveeta
- Optional... Onion flakes, minced garlic, salt and pepper (We like ours Cheesy... that is it! But occasionally I'll add the onion or garlic or both)

Sunday, May 1, 2011

Mother's Day Subway Art

I just love Subway Art... and I think I'm getting the hang of creating it. For a very sentimental Mother's Day gift look no further. The links to download are below. I think I like the gray with pink accents the best.
Have fun with these and Happy Mother's Day!

Click the color below you would like to download


Stay tuned for more subway art... I have a great "Summer" print in the works!

Today's Creative Blog
Not Just a Housewife
DIY Club
Home Stories A 2 Z
Someday Crafts
Simply Designing