Wednesday, February 29, 2012

Swagbucks: Earn Gift Cards for Searching Online

I don’t know about you, but I do a lot of searching online. If I need to find the answer to just about anything, Google is my best friend.
Search & Win
I recently found a blogger writing about Swagbucks – an online search engine that rewards you for searching online — I was all ears. Especially when she told me she had earned enough in Swagbucks in the last four months to receive hundreds of dollars in gift cards.
I did some investigation and learned that Swagbucks is very simple to sign up for. In fact, it takes all of about one minute. There are no fees, no credit card required and no phone number or address requested.
After that, you are credited with 30 points to your account. Download the toolbar and every day as you’re searching online, you’ll earn 10 to 20 or more points. After only 450 points earned, you can get a free $5 Amazon gift card. There are dozens of other prizes, too.
Now, you might be thinking, “What’s the big deal if I only earn a $5 gift card every month?” Well, you’re right, $5 isn’t that exciting. It’s something, but that’s only the beginning. You see, your earnings will exponentially multiply when you refer others.
Do you know anyone else who searches online? I thought so. Well, tell them about Swagbucks, send them your referral link, and you’ll not only instantly earn more points when they sign up, you’ll also earn points for the searching they do online.
Tell lots of folks and you’re well on your way to funding your entire Christmas budget with free gift cards from Swagbucks.
For those of you who have blogs, you’ll especially want to jump on board with this. It’s free, it won’t take much of your time to do, and it could generate a nice stream of gift cards in your mailbox.
I don’t know about you, but that sounds pretty sweet to me! So what are you waiting for? Go sign up here.

Friday, February 10, 2012

How to make Chocolate Suckers... Mustache Style

Pin It I love taking fun photos, and crafting, and blogging, and cooking, and.... the list goes on!  If you combine all of the previously mentioned loves you get an activity and craft that looks a little something like this... read on!
Chocolate Suckers are a cinch to make, who knew?  Not me!  I was looking for a cute idea to top last years super cute Valentine's when I came across the new mustache "fad" ... I really felt I must go a little above just the photo though.  I searched and I found these cool sucker molds from Wilton.  Originally I was going to try and make hard candy style suckers but it became clear that chocolate was the way to go.
Start with the molds... found at this website.
 Obviously you will need some chocolate... for suckers you'll need the little wafer style.  Wilton makes some, Hobby Lobby sells these, Walmart, and I'm sure other places do too... I ordered mine from Wilton when I bought the molds.
 These are sooooo easy.... start by pouring the wafers into a Ziploc bag.  Then you microwave on your defrost setting for 1-2 minutes at a time.
 While the wafers are in the microwave, wipe down the molds with a paper towel and a dab of vegetable oil.
 After every minute or two in the microwave, remove the bag a knead gently.  Continue until your chocolate is melted.
 Just like frosting a cake, cut a tiny little tip off one corner of the bag.
 Fill the mold half way and then add a stick.  Roll the stick and get the whole thing covered with chocolate.  Then fill the remainder of the mold.
 Allow the children to suck the last tinsy tiny big of chocolate out of the bag. 
 Gently tap on the mold to get the surface to smooth out.  Then refrigerate for 5-10 minutes.  Once the chocolate is hard, carefully pop the sucker out.
 Be sure and have a little fun with this.
 Don't forget a few pictures.
 Then eat your heart out!
 Oh chocolate...
 Two year olds LOVE chocolate!
 Tah dah... cutest Valentine's and might even top last years!
FYI... It takes about 1oz. of chocolate per sucker if that helps when you calculate how much to purchase.... AND  any extra chocolate can be re-hardened and saved for later.  Just make a chocolate blob on a piece of wax paper and then stick it in the fridge for a few minutes.  Once it is hard, place it in a sealed bag and save for later.  The chocolate can be reused over and over.... oh SNAP isn't that awesome!
Making your own adorable mustache is super simple!... all you need is a piece of black felt and double sided tape.  Click HERE to view a pattern assortment.
Don't forget to enter my giveaway!!!

Wednesday, February 1, 2012

I Mustache you a question...

We decided to have a little fun with Valentine's Day this year...  We Can't wait to share!  Soon we'll be sharing how to make Valentine's Day Mustache Chocolate Suckers in just a few minutes... and the Camera Strap giveaway ends on Valentine's Day!


Monday, January 30, 2012

House Flip Post #4

We ARE making progress even though it doesn't quite look like much has changed.  For whatever reason Carrie and I haven't asked our husbands for help either.  It isn't that we refuse to ask them... we just want to Do It Ourselves... and with that said, we certainly got our fair share of that.  We demo-ed the rest of things that needed demo-ing and made some significant progress while we were left home alone all weekend with the 7 kids.  The guys went snowmobiling and we decided to be as productive as possible with all our little ones assisting as you can see in the photos below:) 
 Above is the dump truck we filled.  This is our third load of junk!
 I was using the counter top as my completed list... but then, it too came out!
 With our demo efforts we quickly also became electricians and plumbers...
 The good news is we didn't electrocute ourselves or flood the place.
 These pictures show the lovely living room carpet.  It was completely glued to this crappy Masonite board stuff that was nailed to the original wood floors that are over 100 years old!
 Getting this carpet up took nearly 6 hours, 2 grown women, a few small children, a crow bar, two hammers, a sawzall, several Bud Lights, and way too many curse words!
 The floors underneath are really cool and old but beyond repairing for this Flip.
 Aren't our little helpers cute when they are hard at work!
It was super cute that they too needed work gloves on!  Parker's gloves (far right) are mis-matched mittens:)
That is all for now... we are feeling great about our progress and should be breaking the paint sprayer out of the box soon which is going to be AWESOME!
Click here to see the other FLIP posts!
Click here to enter my giveaway!

Thursday, January 26, 2012

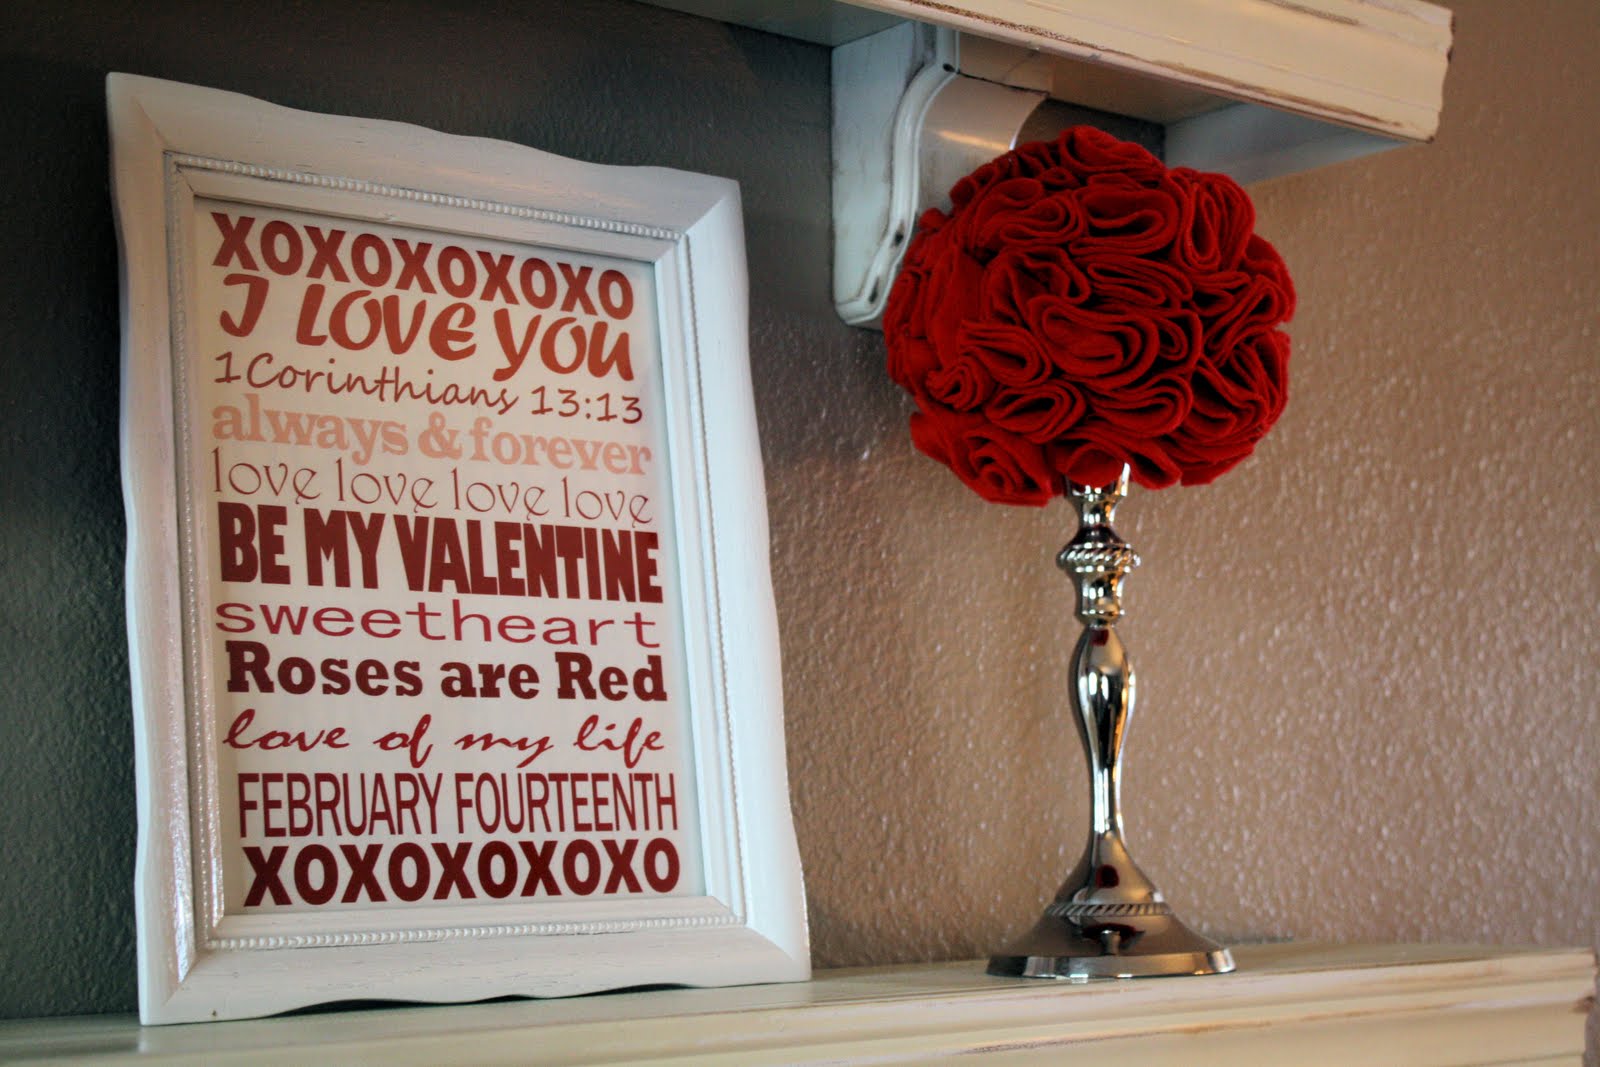
Valentine's Day Mantle

Pin It
If you missed my guest post at At Home with K yesterday then you are in luck because it is right here today!!!  I am taking part in Kindra's Be Mine Bonanza Event and did the below tutorial for the occasion...  If you are in the market for a new camera strap cover check out my giveaway HERE!

-----------

I just love decorating with RED!  This love for red dates back to high school when I had scary and an embarrassing obsession with ladybugs. (you should see my senior pictures... I might as well have been wearing a giant Mickey Mouse sweatshirt... seriously, I look that immature)  Fortunately, I grew out of the ladybug phase, but still love red and that makes Valentine's Day extra fun to decorate for.
Valentine's Day is so fun.  I created a Free Printable and especially love the "1 Corinthians 13:13" line that I embedded in the print.
Above you can see the faux red topiary... read on to see the "how to"
You will need a Styrofoam ball, red felt, scissors, straight pins, and a little bit of time... hence the beer:)... btw... Yes I do know in one picture I reference the Bible and then in the next picture there is a beer... It is Not a sin to have a beer people!
Trace around a cup or something to make a circle pattern on your felt.  Then take your pattern and stack your felt 6 high, at least... hopefully your fabric shears are sharp.  Cut approximately one bajillion circles... haha each topiary was about 1/4 yard of red felt.
To create your "petals" begin by folding a felt circle in half.
then you are going to bring in one-third of it
fold in the other one-third
next stick a straight pin through the corner
stick that sucker in your Styrofoam ball and continue
leave a circular bare spot for the ball to rest on a candlestick.  You could also stick a dowel into the ball and create a slightly different look.  I like the candlesticks... which were wedding gifts that I never knew what to do with because I'm not that fancy, but I love the look with the felt topiaries!
Up Close!
So Pretty!
The printable link is below.
Another use for this technique is to get a Styrofoam heart and create a wreath.
Happy Valentine's Day from Ladycrafter14!!!
and Click HERE to enter my current giveaway!